A Rainy Afternoon at the Drawing Table
A rainy afternoon drawing plan makes it easier to notice shape, light, and texture with a simple setup, while leaving room for unfinished sketches.
The most common mistake in a rainy-afternoon drawing session is choosing a grand subject, unpacking every supply, and expecting a finished picture before the light changes. That turns an easy stretch indoors into a deadline. A rainy afternoon drawing plan works better when it gives your eye one specific puzzle to solve: how a familiar object’s shape changes as you look from the whole to its small details.
Set a mug, pear, or pair of gloves on the table and notice how your mind keeps simplifying it. The mug becomes a cylinder; the pear becomes an oval; the gloves become a pair of bumps. Drawing gets more interesting when you look for the places those simple labels fail: the mug’s handle cuts into its outline, the pear leans, and one glove partly hides the other.
Choose a subject with an interesting outline
Before opening your sketchbook, find an object that will stay put and has a shape you can describe without naming it. A folded cloth has overlapping edges, a closed book has a clear rectangle and a narrow spine, and a potted plant offers leaves that cross one another. These overlaps give your eye something concrete to follow.
Keep the setup close and uncomplicated. A sketchbook or loose paper, a pencil, and an eraser are enough for most subjects. If you use a charcoal pencil, slip scrap paper beneath your hand to limit smudging. A lamp can make edges and shadows easier to see when window light fades; colored pencils are optional if you want to mark one area of color.
- Check the outline: If the object’s edge has a distinctive bend or interruption, draw that shape first; if its outline is plain, add a second object that overlaps it.
- Check whether it stays still: If the subject is stable, keep it in place through the session; if it shifts or needs tending, choose a book, cup, or other settled object instead.
- Check for overlapping parts: If one part crosses another, use that intersection to orient your sketch; if everything sits apart, move the objects closer or choose a subject with more layered shapes.
- Check the light: If you can distinguish the object from its shadow, draw both; if the room is too dim, move near a window or angle a lamp toward the setup.
- Check your available space: If the paper and subject fit without crowding your hand, begin there; if they do not, use a smaller sketchbook and one compact object.
- Check your energy: If you feel settled, stay with one subject for several sketches; if you feel restless, change the drawing question between rounds or stop when your attention runs out.
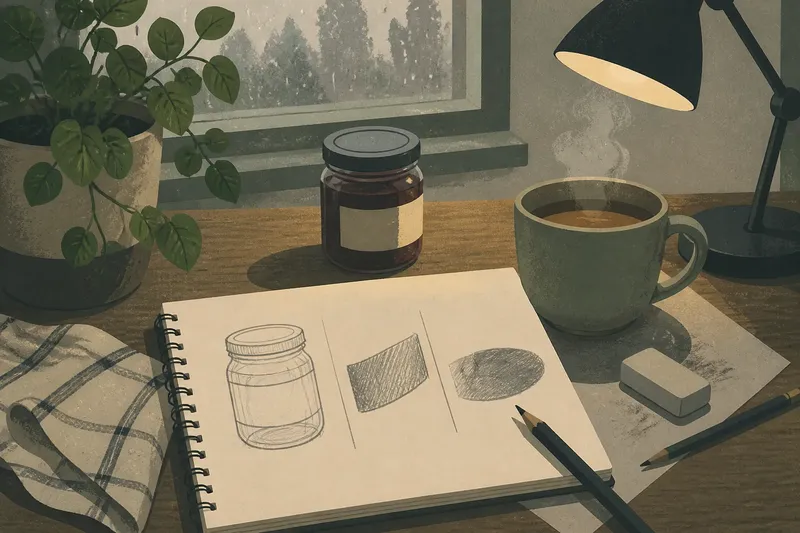
Say you have a damp Saturday, a mug of tea, and only a corner of the kitchen table free. You place a small jam jar beside your pocket sketchbook and make a loose outline, noticing that its shoulder narrows below the lid. Next, you draw the label as a shape crossing the glass rather than as words to copy. After a pause to refill your tea, you sketch only the shadow below the jar. The result is a page showing three different observations, and the choice to draw the label as a shape rather than lettering trades detail for a clearer look at its position.
Use each sketch to investigate a different shape
Drawing the same subject repeatedly does not mean making identical copies. Give each pass a different visual question. Start with the outer contour, then look at how large parts sit beside one another, then notice where one shape interrupts another.
For a mug, one sketch can follow the outer curve from rim to base. In another, treat the handle as a hole in the cup’s silhouette and pay attention to where its inner edge meets the body. In a third, look at the oval opening from your seat rather than drawing it as a flat circle. These choices make the object specific without adding props or chasing a polished result.
Try drawing the empty spaces, too. The gap inside a handle or between two leaves has its own outline. If you can describe that gap more clearly than the object around it, sketch the gap. This is a useful way to notice whether the parts of your drawing relate to one another, without erasing every line that feels uncertain.
Give the session a loose rhythm
A kitchen timer or phone timer can mark pauses, but you can also stop when your attention wanders. The pause matters because it gives you a chance to look at the object again before deciding what to draw next.
- Look before drawing. Notice the object’s largest shape, its position, and any place where one part crosses another. Then make a loose first sketch without correcting each line.
- Step away briefly. Put down the pencil, stretch your hand, or look out the window. Leave the page as it is rather than turning the break into an erasing session.
- Return with one question. Choose a feature you missed, such as the mug handle’s inner edge or the overlap between leaves, and give that feature its own sketch.
- Look at the spaces between parts. Find a gap or shadow that has a clear boundary. Draw it if it catches your eye; otherwise, return to the contour or choose another detail.
- Stop or make one more observation. Close the sketchbook when you are ready, or start a fresh sketch with a new question. The page does not need a tidy ending.
If a timer makes you feel hurried, leave it off. Stand to refill a drink or turn to a clean page when the first one feels crowded. The useful change is not a timed routine; it is looking again before making another mark.
What should I do when the sketch feels wrong?
Should I erase a drawing that looks awkward?
Usually, leave the first sketch visible and start another beside it. That lets you compare what you noticed at first with what you see after looking again, without treating the earlier lines as a problem to repair.
How can I make a simple object more interesting to draw?
Look for an overlap, an enclosed gap, or a change in contour instead of adding decorative details. If the object has none that catch your eye, shift your viewpoint or choose a different subject.
What can I draw if I do not have art supplies?
Use ordinary paper and a pencil or ballpoint pen. A pen leaves permanent marks, so work loosely and let imperfect lines remain rather than trying to erase them.
Do I need to finish the subject before putting everything away?
No. Put the sketchbook away when you are ready, even if the drawing shows only part of the object. The session can end with an observation rather than a completed image.
Put the drawing away without losing the observation
When the rain eases or your attention runs out, put the tools away without grading the pages. If a particular shape caught your eye, write a few words beside the sketch, such as “handle cuts into outline” or “leaf crosses leaf.” Those notes can help you return to the same visual question later without turning an unfinished page into an assignment.
A rainy afternoon drawing plan can begin with one object and a clear way of looking at it: follow the outline, find an overlap, or draw the space between parts. Keep the sketchbook and pencil somewhere easy to reach, and the next session can start with that observation rather than a larger project.